After a long development cycle, we are thrilled to announce the official release of Rolisteam v1.10. This version brings a wave of brand-new tools for Game Masters, a major technical overhaul of the whole project, and a much healthier codebase for the years to come.
Rolisteam now embeds a full mind-map editor, letting you sketch out plots, NPC relationships, or campaign notes visually, right next to your other campaign tools.
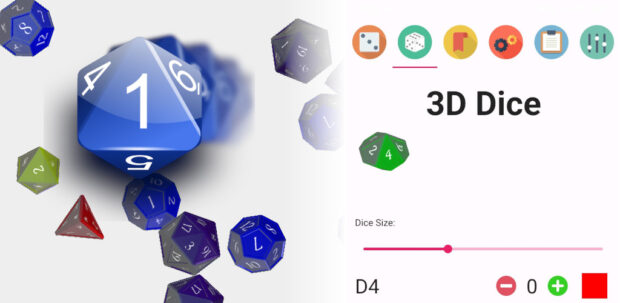
Rolling dice has never been more satisfying. The new 3D dice roller uses a real physics engine to simulate dice tumbling and bouncing, giving your rolls a tactile, tabletop feel.
A brand-new Antagonist panel lets you list and manage all the NPCs of your campaign in one place, with search and filtering options to quickly find the antagonist you need, right when you need it.
Thanks to the KDE translation teams, Rolisteam is now available in even more languages, with existing translations kept up to date release after release.
Refactoring
Under the hood, this release is the result of a massive modernization effort:
Port to Qt 6 — the entire codebase now runs on the Qt 6 framework.
Build system switched to CMake, replacing the previous qmake-based setup.
Websites migrated from self-hosting to KDE’s infrastructure.
Websites migrated from the Pelican generator to Hugo.
Source hosting moved from GitHub to KDE’s GitLab.
Quality
Code quality and long-term maintainability were a major focus of this release:
70% of the code is now covered by unit tests.
An extensive suite of validation tests now runs continuously to catch regressions early.
Dedicated test coverage was added for the mind-map, the character sheet, translations, and the network layer.
Continuous integration now tracks code coverage on every change.
A huge thank you
This release wouldn’t have been possible without the community, the KDE translation teams, and everyone who reported bugs, tested pre-releases, and contributed code. Thank you!
At the first start of an application, user can be a bit confused in front of all of these features, buttons and data.
In response to that, we often have a short presentation of each element on the screen.
This also presents a typical workflow with the application.
First, You need to create a project or document.
Then, define the name, the type…
Then add content using this or that.
This feature is often called UI walk through, or UI tour.
UI Walker
I made this library to provide an easy way to do a walkthrough in any QML application.
Using cmake it is really easy. You can define the library to be a git submodule and then
Prepare you qml code
The whole concept is based on attached property.
To highlight a item, you must define two properties:
WalkerItem.description: the text that will be displayed when this element is highlighted
WalkerItem.weight: Numeric value to define the order (ascending order).
ToolButton {
    WalkerItem.description: qsTr("Description of the element")
    WalkerItem.weight: 104
}
Add the UI walker
Currently, you have to add one item. It should have the size of the whole window.
This item provides several properties in order to help you manage the output.
Highlighted items get notified through two signals: enter and exit.
Defining signal handlers allow you to react. So you can show the full workflow to add new data.
In order, to start the UI tour, you simply have to call the function: start() of the Item.
Of course, it is up to you to trigger it automatically when it’s the first start of the application or if the user asked for the tour.
I have a CPP controller with property UiTour which gives the current status of the tour.
Here, I call directly the walker function. But it may be safer to call a function to reset the state of the window.
Navigation
The walker provides two important function next() and previous() to navigate.
Basically on the walker, you can add buttons in the available Rect to manage the navigation.
Other option, you can define an interval in milliseconds which will call the next() function.
You have to make sure the item is visible while the walker highlight it. It could be tricky to make the path from the end to be beginning. In some case, it is easier to never use the previous function.
Finish it!
Calling the function skip(), close the walker. Then the application is displayed normally.
It can be called at any time.
Cheat code
Function
description
start()
The walker becomes visible, and the first item is highligthed
next()
Highlight the next item, trigger appropriated signals
previous()
Highlight the previous item, trigger appropriated signals
skip()
Hide the walker
How it works ?
The attached properties
In order to harvest all data from the QML, I had to define attached property.
This is the definition of QObject which will be attached, each time a QML item has defined any Walker property.
In the WalkerItem.h, I have to create this static function.
    // …
    Q_OBJECT
    QML_ATTACHED(WalkerAttachedType)
    // …
    static WalkerAttachedType* qmlAttachedProperties(QObject* object)
    {
        QQuickItem* item= qobject_cast<QQuickItem*>(object);
        if(!item)
            qDebug() << "Walker must be attached to an Item";
        s_items.append(item);
        return new WalkerAttachedType(object);
    }
QSceneGraph and Nodes
WalkreItem defines a QML item, written in cpp to be light-weighted.
I used QSGNode to draw it on screen. The item code manages the logic of the walkthrough and the update of the geometry.
To make it short, the SceneGraph is the rendering engine of QML. QSGNode defines an API to communicate with it directly.
First, I create the QML item in cpp, using QSGNode to be rendered.
//walkeritem.h
class WalkerItem : public QQuickItem
{
    Q_OBJECT
    QML_ATTACHED(WalkerAttachedType)
    QML_ELEMENT
    Q_PROPERTY(QString currentDesc READ currentDesc NOTIFY currentChanged FINAL)
    Q_PROPERTY(QColor dimColor READ dimColor WRITE setDimColor NOTIFY dimColorChanged FINAL)
    Q_PROPERTY(qreal dimOpacity READ dimOpacity WRITE setDimOpacity NOTIFY dimOpacityChanged FINAL)
    Q_PROPERTY(QRectF availableRect READ availableRect NOTIFY availableRectChanged FINAL)
    Q_PROPERTY(QRectF borderRect READ borderRect NOTIFY borderRectChanged FINAL)
    Q_PROPERTY(int interval READ interval WRITE setInterval NOTIFY intervalChanged FINAL)
    Q_PROPERTY(bool active READ active NOTIFY activeChanged FINAL)
public:
    WalkerItem();

    // accessors, signals, slots…

protected:
    QSGNode* updatePaintNode(QSGNode*, UpdatePaintNodeData*) override;// update scenegraph
};


//walkeritem.cpp
WalkerItem::WalkerItem()// in the constructor
{
    setFlag(QQuickItem::ItemHasContents);// must be called
    connect(child, &QQuickItem::widthChanged, this, &WalkerItem::updateComputation);
    connect(child, &QQuickItem::heightChanged, this, &WalkerItem::updateComputation);
}

void WalkerItem::updateComputation()
{
    // compute geometry and list any changes that must be sync with the SceneGraph.
    m_change|= WalkerItem::ChangeType::GeometryChanged;
    update();// call to paint the item
}

QSGNode* WalkerItem::updatePaintNode(QSGNode* node, UpdatePaintNodeData*)
{
    auto wNode= static_cast<WalkerNode*>(node);
    if(!wNode)
    {
        wNode= new WalkerNode();//first time
    }

    if(m_change & WalkerItem::ChangeType::ColorChanged)
        wNode->updateColor(m_dimColor);
    if(m_change & WalkerItem::ChangeType::GeometryChanged)
        wNode->update(boundingRect(), m_targetRect);
    if(m_change & WalkerItem::ChangeType::OpacityChanged)
        wNode->updateOpacity(m_dimOpacity);

    m_change= WalkerItem::ChangeType::NoChanges;
    return wNode;
}
We have here an item with a geometry like any other item (x,y,width, height), we also have a dimColor and dimOpacity.
Any time one of these properties change. I have to sync with the QSceneGraph to update either the geometry, the dimColor or the dimOpacity.
Each time, one property changes, I stored the type of change in the m_change member and I call update().
The render engine will call my item with the QSGNode reprenting it on the SceneGraph side.
Then I can call function on my SGNode. When sync is finished I reset the change to NoChange and return the node.
The updatePaintNode can be called with a null node. In this case, you have to create it. It will be the case, the first time. And it could happen later in some cases for optimalization reason.
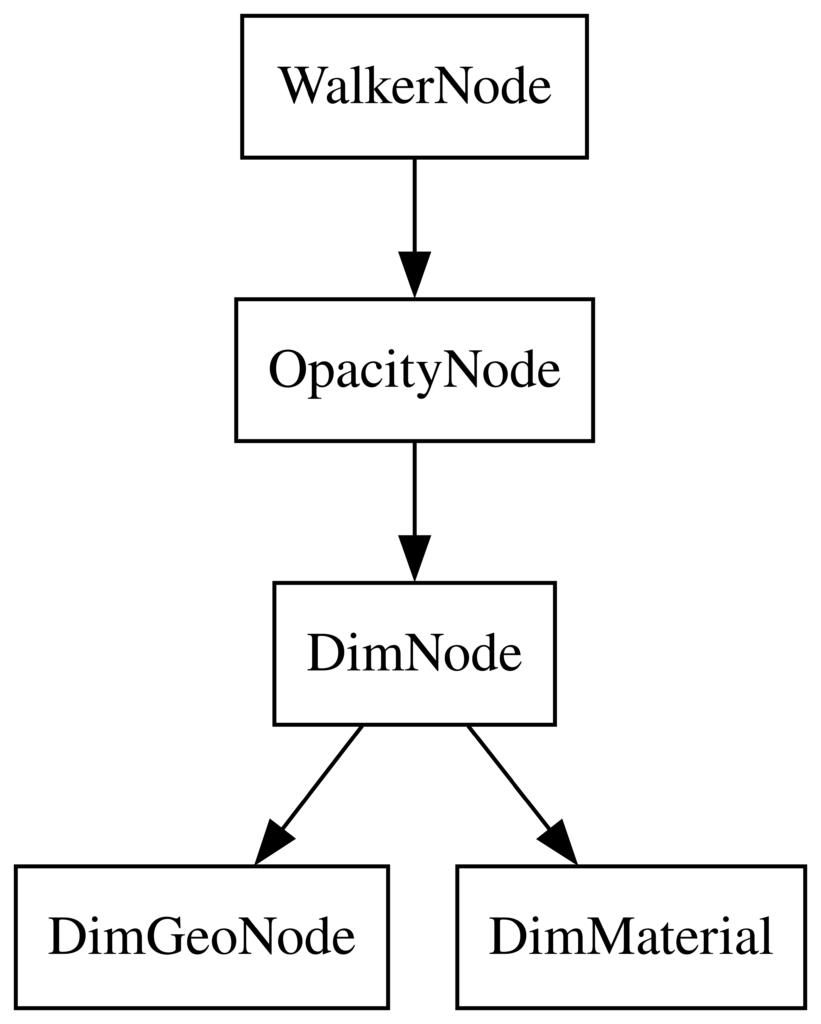
Now, let see the code of the QSGNode. You have to see the QSGNode as the root item of a tree. Where each node is in charge of representing one aspect of the item: its geometry, its color and its opacity.
void WalkerNode::update(const QRectF& out, const QRectF& in)
{
    // out is the geometry of the window
    // in is the geometry of the highlighted item
    const auto a= out.topLeft();
    const auto b= in.topLeft();
    const auto c= in.topRight();
    const auto d= out.topRight();
    const auto e= in.bottomRight();
    const auto f= out.bottomRight();
    const auto g= in.bottomLeft();
    const auto h= out.bottomLeft();

    {
        auto gem= m_dim.geometry();
        auto vertices= gem->vertexDataAsPoint2D();
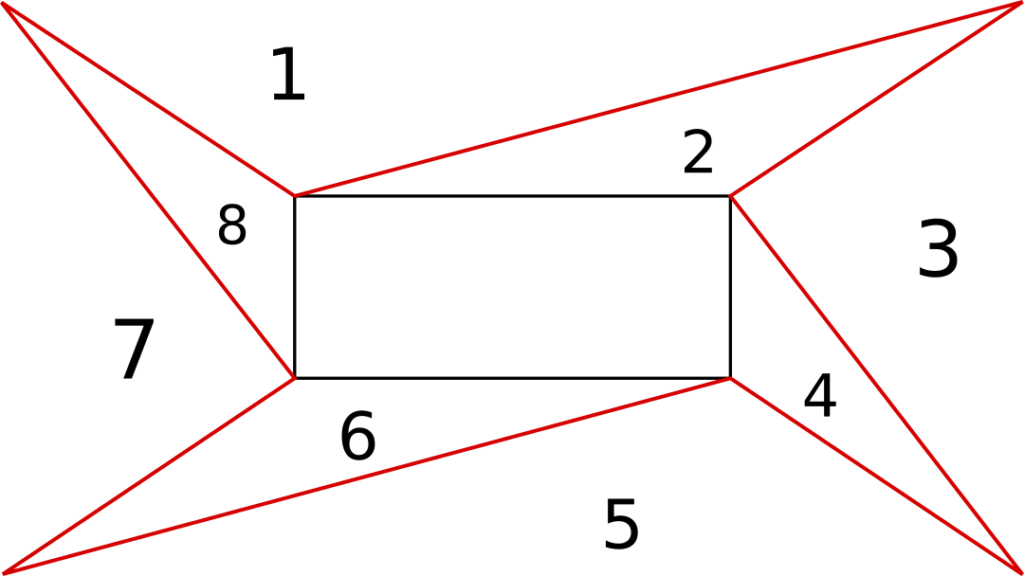
        QList<std::array<QPointF, 3>> triangles{{a, b, d}, {b, d, c}, {d, c, f}, {c, f, e},
                                                {f, e, h}, {e, g, h}, {h, g, a}, {g, a, b}};
        int i= 0;
        for(auto t : triangles)
        {
            vertices[i + 0].set(t[0].x(), t[0].y());
            vertices[i + 1].set(t[1].x(), t[1].y());
            vertices[i + 2].set(t[2].x(), t[2].y());
            i+= 3;
        }

        m_dim.markDirty(QSGNode::DirtyGeometry | QSGNode::DirtyMaterial);
    }

    markDirty(QSGNode::DirtyGeometry | QSGNode::DirtyMaterial);
}
We split the surface we have to cover in triangles.
Todo
Animations: Smooth animation while transiting from one item to another.
Test on bigger apps
Find a logic to allow previous
Use shader effect to make it better.
Other…
Conclusion:
UiWalker is already in production. It works like a charm. I hope to use it elsewhere. Then, I will add some new features. Contributions and comments are welcomed.
QtNat is a lightweight C++ library built with Qt 6 that simplifies NAT port mapping using UPnP (Universal Plug and Play). It is designed to help developers easily expose local services to external networks without requiring manual router configuration for users.
By leveraging UPnP, QtNat automatically communicates with compatible routers to create port forwarding rules at runtime. This makes it particularly useful for peer-to-peer applications, multiplayer games, remote access tools, and any software that needs reliable inbound connectivity behind a NAT.
QtNat provides a simplified API to do all steps automatically: discovery and mapping. This has been tested on my local device. Feel free to test it and improve it.
Use it
    UpnpNat nat;

    QObject::connect(&nat, &UpnpNat::statusChanged, [&nat, &app]() {
        switch(nat.status())
        {
        case UpnpNat::NAT_STAT::NAT_IDLE:
        case UpnpNat::NAT_STAT::NAT_DISCOVERY:
        case UpnpNat::NAT_STAT::NAT_GETDESCRIPTION:
        case UpnpNat::NAT_STAT::NAT_DESCRIPTION_FOUND:
            break;
        case UpnpNat::NAT_STAT::NAT_FOUND:
            nat.requestDescription();
            break;
        case UpnpNat::NAT_STAT::NAT_READY:
            nat.addPortMapping("UpnpTest", nat.localIp(), 6664, 6664, "TCP");
            break;
        case UpnpNat::NAT_STAT::NAT_ADD:
            qDebug() << "It worked!";
            app.quit();
            break;
        case UpnpNat::NAT_STAT::NAT_ERROR:
            qDebug() <<"Error:" <<nat.error();
            app.exit(1);
            break;
        }
    });

    nat.discovery();
We create the object (l:0)
We connect to statusChanged signal to get notified (l:2)
When status is NAT_FOUND, we request the description (l:11)
When status is NAT_READY, we request the port mapping (l:14)
When status is NAT_ADD, It means the port mapping request has been added, It worked! The application quits.(l:17)
When status is NAT_ERROR, Error occured and display the error text. The application exits on error. (l:21)
We connect to error changed in order to detect errors. (l:14)
We start the discovery. (l:28)
Technical explainations
The discovery
Basically, we need to know if there is a upnp server around.
To do so, we send an M-SEARCH request on the multicast address.
Here is the code:
#define HTTPMU_HOST_ADDRESS "239.255.255.250"
#define HTTPMU_HOST_PORT 1900
#define SEARCH_REQUEST_STRING "M-SEARCH * HTTP/1.1\n"            \
                              "ST:UPnP:rootdevice\n"             \
                              "MX: 3\n"                          \
                              "Man:\"ssdp:discover\"\n"          \
                              "HOST: 239.255.255.250:1900\n"     \
                                                            "\n"
void UpnpNat::discovery()
{
    setStatus(NAT_STAT::NAT_DISCOVERY);
    m_udpSocketV4.reset(new QUdpSocket(this));

    QHostAddress broadcastIpV4(HTTPMU_HOST_ADDRESS);

    m_udpSocketV4->bind(QHostAddress(QHostAddress::AnyIPv4), 0);
    QByteArray datagram(SEARCH_REQUEST_STRING);

    connect(m_udpSocketV4.get(), &QTcpSocket::readyRead, this, [this]() {
        QByteArray datagram;
        while(m_udpSocketV4->hasPendingDatagrams())
        {
            datagram.resize(int(m_udpSocketV4->pendingDatagramSize()));
            m_udpSocketV4->readDatagram(datagram.data(), datagram.size());
        }

        QString result(datagram);
        auto start= result.indexOf("http://");

        if(start < 0)
        {
            setError(tr("Unable to read the beginning of server answer"));
            setStatus(NAT_STAT::NAT_ERROR);
            return;
        }

        auto end= result.indexOf("\r", start);
        if(end < 0)
        {
            setError(tr("Unable to read the end of server answer"));
            setStatus(NAT_STAT::NAT_ERROR);
            return;
        }

        m_describeUrl= result.sliced(start, end - start);

        setStatus(NAT_STAT::NAT_FOUND);
        m_udpSocketV4->close();
    });

    connect(m_udpSocketV4.get(), &QUdpSocket::errorOccurred, this, [this](QAbstractSocket::SocketError) {
        setError(m_udpSocketV4->errorString());
        setStatus(NAT_STAT::NAT_ERROR);
    });

    m_udpSocketV4->writeDatagram(datagram, broadcastIpV4, HTTPMU_HOST_PORT);
}
The whole goal of the discovery is to get the description file from the server with all available devices and services.
The result is stored in m_describeUrl.
Your physical network device may act as several Upnp devices.
You are looking for one of these device type:
urn:schemas-upnp-org:device:InternetGatewayDevice
urn:schemas-upnp-org:device:WANDevice
urn:schemas-upnp-org:device:WANConnectionDevice
Those type are followed with a number (1 or 2), It is the Upnp protocol version supported by the device.
void UpnpNat::processXML(QNetworkReply* reply)
{
    auto data= reply->readAll();

    if(data.isEmpty()) {
        setError(tr("Description file is empty"));
        setStatus(NAT_STAT::NAT_ERROR);
        return;
    }

    setStatus(NAT_STAT::NAT_DESCRIPTION_FOUND);

    /*
     Boring XML parsing in order to find devices and services.
     Devices:
        constexpr auto deviceType1{"urn:schemas-upnp-org:device:InternetGatewayDevice"};
        constexpr auto deviceType2{"urn:schemas-upnp-org:device:WANDevice"};
        constexpr auto deviceType3{"urn:schemas-upnp-org:device:WANConnectionDevice"};

     Services:
        constexpr auto serviceTypeWanIP{"urn:schemas-upnp-org:service:WANIPConnection"};
        constexpr auto serviceTypeWANPPP{"urn:schemas-upnp-org:service:WANPPPConnection"};
     */

     m_controlUrl = /* Most important thing to find the controlUrl of the proper service.*/

    setStatus(NAT_STAT::NAT_READY);
}
Send mapping Request
Sending a request is just sending HTTP request with the proper data.
Level up your tabletop RPG experience with Dice Roller 3D! Whether you’re deep into D&D, Pathfinder, or your favorite homebrew system, DicelyVerse gives you all the power of physical dice and more—right in your pocket.
🌀 3D Dice Rolling Engine Feel the thrill of real dice physics with stunning 3D visuals. Roll multiple dice with satisfying animations.
💬 Roll Dice with Commands Type d20+5 or any custom command to get your results instantly. Supports advanced syntax for complex rolls!
The command engine is DiceParser. See the documentation here.
🔁 Reroll with Ease Need a second chance? Reroll instantly without retyping your command or resetting your dice.
📦 Macros – One Tap Commands Save your favorite or frequently used dice rolls as macros for quick access. Perfect for initiative rolls, attack rolls, and spell damage!
✍️ Aliases – Shortcuts for Long Commands Tired of long roll strings? Set up aliases to keep your gameplay fast and your input clean.
📖 Character Sheet Integration Store your character’s stats, modifiers, and abilities directly in the app. Pull values into rolls on the fly.
👥 Multiple Profiles Play multiple campaigns or characters? No problem. Create separate profiles to keep everything organized.
🌘 Dark Mode Change the UI to dark mode or light mode on the fly (no need to restart).
🌐 Translation
DicelyVerse has translations available now: English, German, French, Italian, Spanish and Portuguese.
🎥 Watch it in Action!
📺 Check out our YouTube demo video showcasing the app’s features and real-time gameplay experience:
📱 Download Now on Android!
Simplify your tabletop experience. Make every roll count—with flair.
I would like to show you my first QtCreator plugin. It is an all-in-one window to test Qml Code.
How often do you run into issue about QML code; not doing exactly what you want ?
Demo:
Examples demo:
Here it a simple tool to test quickly some QML code. No need to create a new Test Project.
Open the plugin, type or copy/paste your code, do some changes until it does what you want.
It is mostly inspired from some Qml online site, but it is available directly into QtCreator.
I would like to show the evolution of one function in rolisteam code.
This function is called when the user (Game Master) closes a map or image.
The function must close the map or image and send a network order to each player to close the image or plan.
At the beginning, the function looked like that.
Some code line and comments were written in French. No coding rules were respected.
Low-level code for networking. The function was very long.
A big step forward, the networking code has been reworked.
So the readability is improved. It is also possible to see the beginning of polymorphism. MediaContener is used but not everywhere.
Then, we implements a solution to describe map, vmap (v1.8) or image as mediacontener.
They share a large part of their code, so it becomes really easy to do it.
To prepare my conference at Pas Sage En Seine [FR], a French hacking festival, I chose to write my slide presentation in QML.
It allows me to have better control and be free to do whatever I want (such as a timeline or any kind of animation).
Of course, That comes with a price. It is longer to do it that way but now I find some solutions. So, next time will be faster.
File hierarchy:
I preferred use QML through C++ Application. It provides more helpful feature, such as: the ability to make screenshots of your presentation at any time (useful as backup plan).
At the top level, you will found all C++ classes, project files and the main qml. Then, you will have a directory with all your pages and if it is required a directory with all your images.
It can be useful to see the state of the presentation and to read some extra notes about the current slide. To manage that, I wrote a small C++ application.
The first goal is to show the QML view, then add some features and communication between the QML view and the C++ window.
Really easy, it loads the main.qml from the resources management system provided by Qt. It defines the targeted resolution by setting two constant into QML word: ScreenW and ScreenH.
In this project, the QmlControler class is the C++ window which provides slide feedback and additional information.
Let’s take a look to it:
Feedback window
This window is really simple. It has two parts: On the left, there is a label which displays screenshot of the qml view, and the right part is a QTextArea which display any additional note about the current slide.
[pastacode lang=”cpp” manual=”void%20QmlControler%3A%3AcurrentPageHasChanged(int%20i)%0A%7B%0A%20%20%20%20m_currentScreen%20%3D%20i%3B%0A%20%20%20%20QImage%20img%20%3D%20m_window-%3EgrabWindow()%3B%0A%0A%20%20%20%20if(img.isNull())%0A%20%20%20%20%20%20%20%20return%3B%0A%0A%20%20%20%20static%20int%20count%20%3D%200%3B%0A%0A%0A%20%20%20%20img.save(tr(%22screens%2F%251_screen.png%22).arg(%2B%2Bcount%2C3%2C10%2CQChar(‘0’))%2C%22png%22)%3B%0A%20%20%20%20qDebug()%20%3C%3C%20%22screen%20shot%20save%22%20%3C%3C%20count%3B%0A%0A%20%20%20%20m_ratioImage%20%3D%20(double)img.size().width()%2Fimg.size().height()%3B%0A%20%20%20%20m_ratioImageBis%20%3D%20(double)img.size().height()%2Fimg.size().width()%3B%0A%0A%20%20%20%20m_label-%3EsetPixmap(QPixmap%3A%3AfromImage(img))%3B%0A%0A%20%20%20%20if((i%2B1%3E%3D0)%26%26(i%2B1%3Cm_commentData.size()))%0A%20%20%20%20%7B%0A%20%20%20%20%20%20%20%20ui-%3EtextEdit-%3EsetHtml(m_commentData.at(i%2B1))%3B%0A%20%20%20%20%7D%0A%20%20%20%20resizeLabel()%3B%0A%7D” message=”Current slide has changed” highlight=”” provider=”manual”/]
When the current slide has changed, the c++ window is notified thought the slot currentPageHasChanged, The application gets screenshot of the qml view, save it as a file, display it thought the label, then it looks for data about the current slide into the model. If any, there are displayed in the textedit.
Saving screenshots into file allows you to create a pdf file as backup plan for your presentation.
$ convert *.png mypresentation.pdf
QML Application
Loader system.
For readability reason, it is easier to have each page into one qml file. The application has to load those pages in the right order. To reach this goal, we have to define the order. I did it thank to a data model inside the main.qml file.
The main.qml displays all pages as item of a pathview. All items are loaded from the qt resource management system.
[pastacode lang=”css” manual=”ListModel%20%7B%0A%20%20%20%20%20%20%20%20%20%20%20%20id%3A%20panelModel%0A%20%20%20%20%20%20%20%20%20%20%20%20ListElement%20%7B%0A%20%20%20%20%20%20%20%20%20%20%20%20%20%20%20%20name%3A%20%22Intro%22%0A%20%20%20%20%20%20%20%20%20%20%20%20%20%20%20%20path%3A%20%2201_intro.qml%22%0A%20%20%20%20%20%20%20%20%20%20%20%20%20%20%20%20time%3A%201%0A%20%20%20%20%20%20%20%20%20%20%20%20%20%20%20%20next%3A%20%22Pr%C3%A9sentation%20de%20Rolisteam%22%0A%20%20%20%20%20%20%20%20%20%20%20%20%7D” message=”First item of the model.” highlight=”” provider=”manual”/]
A page is mainly defined by two data: name and path. The path is the name of the qml file.
All other data are here as help, the time has not been used.
Then, the loader does its job, the key lines are the following:
To manage the table of contents, I added a listview with a model:
[pastacode lang=”css” manual=”%20%20%20%20ListView%20%7B%0A%20%20%20%20%20%20%20%20id%3A%20listView1%0A%20%20%20%20%20%20%20%20x%3A%20ScreenW*0.02%0A%20%20%20%20%20%20%20%20y%3A%20ScreenH*0.3%0A%20%20%20%20%20%20%20%20width%3A%20ScreenW%2F2%0A%20%20%20%20%20%20%20%20height%3A%20ScreenH*0.2%0A%20%20%20%20%20%20%20%20delegate%3A%20Item%20%7B%0A%20%20%20%20%20%20%20%20%20%20%20%20width%3A%20ScreenW%2F2%0A%20%20%20%20%20%20%20%20%20%20%20%20height%3A%20listView1.height%2FlistView1.count%0A%20%20%20%20%20%20%20%20%20%20%20%20%20%20%20%20Text%20%7B%0A%20%20%20%20%20%20%20%20%20%20%20%20%20%20%20%20%20%20%20%20color%3A%20view.currentIndex%3E%3Dindex%20%3F%20%22black%22%20%3A%20%22gray%22%0A%20%20%20%20%20%20%20%20%20%20%20%20%20%20%20%20%20%20%20%20text%3A%20name%0A%20%20%20%20%20%20%20%20%20%20%20%20%20%20%20%20%20%20%20%20font.pointSize%3A%20ScreenH%2F48%0A%20%20%20%20%20%20%20%20%20%20%20%20%20%20%20%20%20%20%20%20anchors.verticalCenter%3A%20parent.verticalCenter%0A%20%20%20%20%20%20%20%20%20%20%20%20%20%20%20%20%20%20%20%20font.bold%3A%20true%0A%0A%20%20%20%20%20%20%20%20%20%20%20%20%20%20%20%20%7D%0A%20%20%20%20%20%20%20%20%7D%0A%20%20%20%20%20%20%20%20visible%3A%20view.currentIndex%3E0%20%3F%20true%20%3A%20false%0A%0A%20%20%20%20%20%20%20%20model%3A%20ListModel%20%7B%0A%20%20%20%20%20%20%20%20%20%20%20%20ListElement%20%7B%0A%20%20%20%20%20%20%20%20%20%20%20%20%20%20%20%20name%3A%20%22Concepts%22%0A%20%20%20%20%20%20%20%20%20%20%20%20%20%20%20%20index%3A1%0A%20%20%20%20%20%20%20%20%20%20%20%20%7D%0A%20%20%20%20%20%20%20%20%20%20%20%20ListElement%20%7B%0A%20%20%20%20%20%20%20%20%20%20%20%20%20%20%20%20name%3A%20%22Chroniques%22%0A%20%20%20%20%20%20%20%20%20%20%20%20%20%20%20%20index%3A6%0A%20%20%20%20%20%20%20%20%20%20%20%20%7D%0A%20%20%20%20%20%20%20%20%20%20%20%20ListElement%20%7B%0A%20%20%20%20%20%20%20%20%20%20%20%20%20%20%20%20name%3A%20%22Logiciel%22%2F%2Fsyst%C3%A8me%20de%20build%2C%20code%20sp%C3%A9cifique%20par%20OS.%0A%20%20%20%20%20%20%20%20%20%20%20%20%20%20%20%20index%3A9%0A%20%20%20%20%20%20%20%20%20%20%20%20%7D%0A%20%20%20%20%20%20%20%20%20%20%20%20ListElement%20%7B%0A%20%20%20%20%20%20%20%20%20%20%20%20%20%20%20%20name%3A%20%22Bilan%22%0A%20%20%20%20%20%20%20%20%20%20%20%20%20%20%20%20index%3A15%0A%20%20%20%20%20%20%20%20%20%20%20%20%7D%0A%20%20%20%20%20%20%20%20%7D%0A%20%20%20%20%7D” message=”Table of contents in QML ” highlight=”” provider=”manual”/]
Next slide
When you have many slides it can be helpful to have indication about the next one. I chose to display the title in the top-right corner. It was the easier way.
Each page are independent but they are all based on the same pattern. In my case, they have a listview with model. Each item of the model is an point I should talk about it.
Each item has a index. The index is controlled with keyboard (down to increase, up to decrease). The page manages what is shown or hidden given the value of the index.
For example, the feature of dice alias has 10 as index. When the index page value becomes 10, the «Dice Alias» item is displayed with an animation. Then, at 11, I can show a screen shot about the dice alias. At 12, the screenshot disappears and another text is displayed.
Position and Size
To ensure that all items will be display at the proper position and size. I have based all computation on anchor or the screen size.
[pastacode lang=”css” manual=”%20%20%20%20Image%20%7B%0A%20%20%20%20%20%20%20%20id%3A%20image1%0A%20%20%20%20%20%20%20%20anchors.left%3A%20parent.left%0A%20%20%20%20%20%20%20%20anchors.top%3A%20parent.top%0A%20%20%20%20%20%20%20%20anchors.leftMargin%3A%20ScreenW*0.04%0A%20%20%20%20%20%20%20%20fillMode%3A%20Image.PreserveAspectFit%0A%20%20%20%20%20%20%20%20source%3A%20%22qrc%3A%2Frsrc%2FRolisteam.svg%22%0A%20%20%20%20%20%20%20%20width%3A%20ScreenW*0.2%0A%20%20%20%20%7D” message=”Display the logo at the right position and size.” highlight=”” provider=”manual”/]
Other way
There is a module that provides Items to create QML presentation. I don’t use it for this one but it may provide interesting things.