Tag Archives: qml

UI walker – UI Walk through in QML

The problem

At the first start of an application, user can be a bit confused in front of all of these features, buttons and data. In response to that, we often have a short presentation of each element on the screen. This also presents a typical workflow with the application.

First, You need to create a project or document. Then, define the name, the type… Then add content using this or that.

This feature is often called UI walk through, or UI tour.

UI Walker

I made this library to provide an easy way to do a walkthrough in any QML application.

Include Ui Walker to your project

target_link_libraries(MyProject
PRIVATE
    Qt6::Core
    Qt6::Quick
    WalkerComponent # add UIWalker
)

Using cmake it is really easy. You can define the library to be a git submodule and then

Prepare you qml code

The whole concept is based on attached property. To highlight a item, you must define two properties:

  • WalkerItem.description: the text that will be displayed when this element is highlighted
  • WalkerItem.weight: Numeric value to define the order (ascending order).
ToolButton {
    WalkerItem.description: qsTr("Description of the element")
    WalkerItem.weight: 104
}

Add the UI walker

Currently, you have to add one item. It should have the size of the whole window. This item provides several properties in order to help you manage the output.

Properties:

namedescriptiontype
countTotal number of highlighted Itemint
currentIndex of the current highlighted itemint
currentDescDescription of the current itemQString
dimColorColor which hides the rest of the applicationQColor
dimOpacityOpacity of the dimqreal
availableRectBiggest Rectangle (where text can be displayed).QRectF
borderRectRect of the current highlighted itemQRectF
intervalDefine the time interval on each highlighted itemint
activeTrue when the Walker is displayedbool

Here is an example:

 WalkerItem {
    id: walker
    anchors.fill: parent
    visible: false
    dimOpacity: 0.8

    onActiveChanged: {
        //walker.active
    }
        
    Label {
        id: label

        
        text: walker.currentDesc // text from walker
        x: walker.availableRect.x // calculated position
        y: walker.availableRect.y // calculated position
        width: walker.availableRect.width // calculated position
        height: walker.availableRect.height // calculated position
    }
    
    Rectangle {
        x: walker.borderRect.x-2
        y: walker.borderRect.y-2
        width: walker.borderRect.width+4
        height: walker.borderRect.height+4
        border.color: "red"
        color: "transparent"
        radius: 10
        border.width: 4
    }

    ToolButton {
        icon.source: walker.current + 1 === walker.count ? "qrc:/finish.svg" : "qrc:/next.svg"
        
        onClicked:{
            if(walker.current +1 === walker.count)
                walker.skip()
            else
                walker.next()
        }   
    }
}

React on Highlight event

Highlighted items get notified through two signals: enter and exit. Defining signal handlers allow you to react. So you can show the full workflow to add new data.

TextField {
    id: nameField
    // …
    WalkerItem.description: qsTr("Set macro name.")
    WalkerItem.weight: 30
    WalkerItem.onEnter: {
        nameField.text = qsTr("Skill Roll")
    }
}

Start it !

In order, to start the UI tour, you simply have to call the function: start() of the Item. Of course, it is up to you to trigger it automatically when it’s the first start of the application or if the user asked for the tour.

Here you have an example:

Component.onCompleted: {
    if(DiceMainController.uiTour === DiceMainController.UnDone) {
        walker.start()
    }
}

I have a CPP controller with property UiTour which gives the current status of the tour. Here, I call directly the walker function. But it may be safer to call a function to reset the state of the window.

The walker provides two important function next() and previous() to navigate. Basically on the walker, you can add buttons in the available Rect to manage the navigation.

Other option, you can define an interval in milliseconds which will call the next() function.

You have to make sure the item is visible while the walker highlight it. It could be tricky to make the path from the end to be beginning. In some case, it is easier to never use the previous function.

Finish it!

Calling the function skip(), close the walker. Then the application is displayed normally. It can be called at any time.

Cheat code

Functiondescription
start()The walker becomes visible, and the first item is highligthed
next()Highlight the next item, trigger appropriated signals
previous()Highlight the previous item, trigger appropriated signals
skip()Hide the walker

How it works ?

The attached properties

In order to harvest all data from the QML, I had to define attached property.

This is the definition of QObject which will be attached, each time a QML item has defined any Walker property.

class WalkerAttachedType : public QObject
{
    Q_OBJECT
    Q_PROPERTY(QString description READ description WRITE setDescription NOTIFY descriptionChanged FINAL)
    Q_PROPERTY(int weight READ weight WRITE setWeight NOTIFY weightChanged FINAL)
    QML_ANONYMOUS
public:
    explicit WalkerAttachedType(QObject* parent= nullptr);
    //…
signals:
    void enter();
    void exit();
    //…
};

In the WalkerItem.h, I have to create this static function.

    // …
    Q_OBJECT
    QML_ATTACHED(WalkerAttachedType)
    // …
    static WalkerAttachedType* qmlAttachedProperties(QObject* object)
    {
        QQuickItem* item= qobject_cast<QQuickItem*>(object);
        if(!item)
            qDebug() << "Walker must be attached to an Item";
        s_items.append(item);
        return new WalkerAttachedType(object);
    }

QSceneGraph and Nodes

WalkreItem defines a QML item, written in cpp to be light-weighted. I used QSGNode to draw it on screen. The item code manages the logic of the walkthrough and the update of the geometry.

To make it short, the SceneGraph is the rendering engine of QML. QSGNode defines an API to communicate with it directly.

First, I create the QML item in cpp, using QSGNode to be rendered.

//walkeritem.h
class WalkerItem : public QQuickItem
{
    Q_OBJECT
    QML_ATTACHED(WalkerAttachedType)
    QML_ELEMENT
    Q_PROPERTY(QString currentDesc READ currentDesc NOTIFY currentChanged FINAL)
    Q_PROPERTY(QColor dimColor READ dimColor WRITE setDimColor NOTIFY dimColorChanged FINAL)
    Q_PROPERTY(qreal dimOpacity READ dimOpacity WRITE setDimOpacity NOTIFY dimOpacityChanged FINAL)
    Q_PROPERTY(QRectF availableRect READ availableRect NOTIFY availableRectChanged FINAL)
    Q_PROPERTY(QRectF borderRect READ borderRect NOTIFY borderRectChanged FINAL)
    Q_PROPERTY(int interval READ interval WRITE setInterval NOTIFY intervalChanged FINAL)
    Q_PROPERTY(bool active READ active NOTIFY activeChanged FINAL)
public:
    WalkerItem();
    
    // accessors, signals, slots…

protected:
    QSGNode* updatePaintNode(QSGNode*, UpdatePaintNodeData*) override;// update scenegraph
};


//walkeritem.cpp
WalkerItem::WalkerItem()// in the constructor
{
    setFlag(QQuickItem::ItemHasContents);// must be called
    connect(child, &QQuickItem::widthChanged, this, &WalkerItem::updateComputation);
    connect(child, &QQuickItem::heightChanged, this, &WalkerItem::updateComputation);
}

void WalkerItem::updateComputation()
{
    // compute geometry and list any changes that must be sync with the SceneGraph.
    m_change|= WalkerItem::ChangeType::GeometryChanged;
    update();// call to paint the item
}

QSGNode* WalkerItem::updatePaintNode(QSGNode* node, UpdatePaintNodeData*)
{
    auto wNode= static_cast<WalkerNode*>(node);
    if(!wNode)
    {
        wNode= new WalkerNode();//first time
    }

    if(m_change & WalkerItem::ChangeType::ColorChanged)
        wNode->updateColor(m_dimColor);
    if(m_change & WalkerItem::ChangeType::GeometryChanged)
        wNode->update(boundingRect(), m_targetRect);
    if(m_change & WalkerItem::ChangeType::OpacityChanged)
        wNode->updateOpacity(m_dimOpacity);

    m_change= WalkerItem::ChangeType::NoChanges;
    return wNode;
}

We have here an item with a geometry like any other item (x,y,width, height), we also have a dimColor and dimOpacity. Any time one of these properties change. I have to sync with the QSceneGraph to update either the geometry, the dimColor or the dimOpacity. Each time, one property changes, I stored the type of change in the m_change member and I call update().

The render engine will call my item with the QSGNode reprenting it on the SceneGraph side. Then I can call function on my SGNode. When sync is finished I reset the change to NoChange and return the node.

The updatePaintNode can be called with a null node. In this case, you have to create it. It will be the case, the first time. And it could happen later in some cases for optimalization reason.

Now, let see the code of the QSGNode. You have to see the QSGNode as the root item of a tree. Where each node is in charge of representing one aspect of the item: its geometry, its color and its opacity.

// header
class WalkerNode : public QSGNode
{
public:
    WalkerNode();
    virtual ~WalkerNode();
    void update(const QRectF& outRect, const QRectF& inRect);
    void updateColor(const QColor& dim);
    void updateOpacity(qreal opacity);

private:
    QSGOpacityNode m_opacity;
    QSGFlatColorMaterial m_dimMat;
    QSGGeometryNode m_dim;
};

In the constructor, I create each node, and then I define the hierarchy.

WalkerNode::WalkerNode()
{
    auto dimGeo= new QSGGeometry(QSGGeometry::defaultAttributes_Point2D(), 0);
    dimGeo->setDrawingMode(QSGGeometry::DrawTriangles);
    dimGeo->allocate(triangleCount * 3);

    m_dim.setGeometry(dimGeo);
    m_dim.setMaterial(&m_dimMat);
    m_dimMat.setColor(Qt::black);

    m_opacity.setOpacity(0.6);

    m_opacity.appendChildNode(&m_dim);
    appendChildNode(&m_opacity);

    markDirty(QSGNode::DirtyMaterial | QSGNode::DirtyGeometry | QSGNode::DirtyOpacity);
}

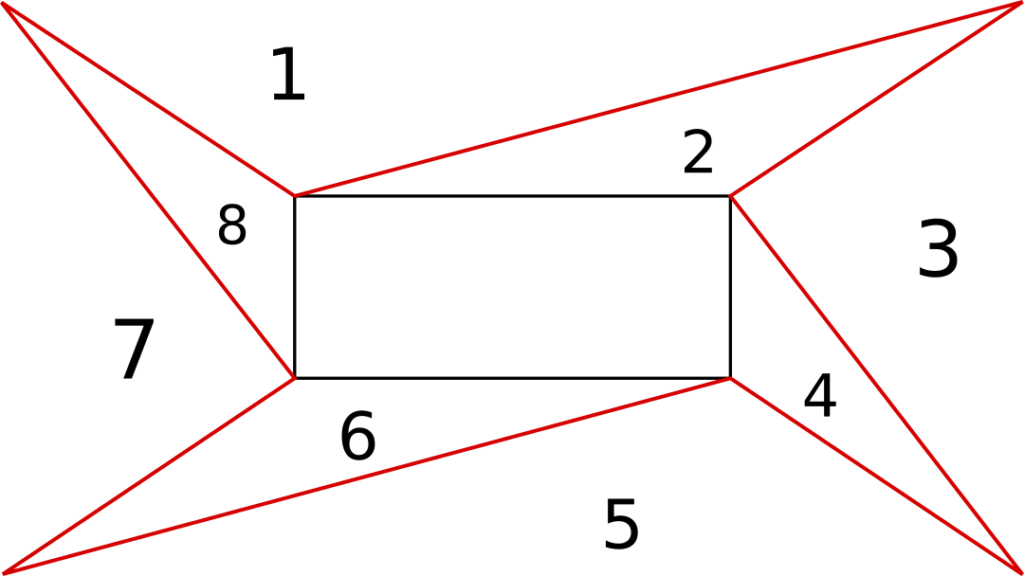
Here the final tree:

Define or Update the geometry

void WalkerNode::update(const QRectF& out, const QRectF& in)
{
    // out is the geometry of the window
    // in is the geometry of the highlighted item
    const auto a= out.topLeft();
    const auto b= in.topLeft();
    const auto c= in.topRight();
    const auto d= out.topRight();
    const auto e= in.bottomRight();
    const auto f= out.bottomRight();
    const auto g= in.bottomLeft();
    const auto h= out.bottomLeft();

    {
        auto gem= m_dim.geometry();
        auto vertices= gem->vertexDataAsPoint2D();
        QList<std::array<QPointF, 3>> triangles{{a, b, d}, {b, d, c}, {d, c, f}, {c, f, e},
                                                {f, e, h}, {e, g, h}, {h, g, a}, {g, a, b}};
        int i= 0;
        for(auto t : triangles)
        {
            vertices[i + 0].set(t[0].x(), t[0].y());
            vertices[i + 1].set(t[1].x(), t[1].y());
            vertices[i + 2].set(t[2].x(), t[2].y());
            i+= 3;
        }

        m_dim.markDirty(QSGNode::DirtyGeometry | QSGNode::DirtyMaterial);
    }

    markDirty(QSGNode::DirtyGeometry | QSGNode::DirtyMaterial);
}

We split the surface we have to cover in triangles.

Todo

  1. Animations: Smooth animation while transiting from one item to another.
  2. Test on bigger apps
  3. Find a logic to allow previous
  4. Use shader effect to make it better.
  5. Other…

Conclusion:

UiWalker is already in production. It works like a charm. I hope to use it elsewhere. Then, I will add some new features. Contributions and comments are welcomed.

Hope you find this article interesting.

Qt Creator plugin : Simple all-in-one QML editor

Hello all,

I would like to show you my first QtCreator plugin. It is an all-in-one window to test Qml Code.

How often do you run into issue about QML code; not doing exactly what you want ?

Demo:


Examples demo:


Here it a simple tool to test quickly some QML code. No need to create a new Test Project.
Open the plugin, type or copy/paste your code, do some changes until it does what you want.

It is mostly inspired from some Qml online site, but it is available directly into QtCreator.


Git repo: https://github.com/obiwankennedy/QmlSampleEditor

Download: https://github.com/obiwankennedy/QmlSampleEditor/actions/runs/

QML – Tutoriel 4 – Bindings et les mĂ©thodes de travail

Bindings + Méthode de travail:
Notions abordées:
-Les syntaxes pour le Binding

Le code de la présentation: https://github.com/obiwankennedy/Learn-Qt
Le code de l’exercice: 04_exercice_binding
La correction sera dans le prochain épisode.


Lien youtube: https://youtu.be/A-SMHKkH19U

Supporter le logiciel et la chaîne: https://liberapay.com/Rolisteam/donate
Rolisteam: http://www.rolisteam.org/

QML – Tutoriel 3 – Les attributs

Les attributs:
Notions abordées:
-id
-Propriétés
-Signaux
-Gestionnaire de Signaux
-Gestionnaires et propriétés groupés.
-méthodes
-Enumération

Fichier à télécharger: 03_attributs

Le code de la présentation: https://github.com/obiwankennedy/Learn-Qt


Lien youtube: https://youtu.be/tDSVlrsQJU0

QML – Tutoriel 2 – Le positionnement

Le positionnement:
-Apprenez à positionner vos éléments.
Notions abordées:
-Positionnement absolue
-Ancres
-Les positionneurs
-Les layouts
Le code de la présentation: https://github.com/obiwankennedy/Learn-Qt

Ressources du tutoriel: 03_positionnement


Lien youtube: https://youtu.be/QDbn1CDjc14

Supporter le logiciel et la chaîne: https://liberapay.com/Rolisteam/donate
Rolisteam: http://www.rolisteam.org/

QML – Tutoriel 1 – Introduction

Introduction:
-Apprenez Ă  installer les outils pour programmer en QML.
-Création d’un projet QML.
-Découverte du premier programme.
-Introduction des types de base du QML (Item, Rectangle, Image, Text, TextInput, TextArea, MouseArea, Timer, Flickable)


Téléchargez les ressources de l’épisode

Liens Utiles:
Qt: https://www.qt.io/download
RCSE: http://www.rolisteam.org/download.html (Lire attentivement en fonction de vos plate formes)
Le code de la présentation: https://github.com/obiwankennedy/Learn-Qt

Exemple QML:
https://www.youtube.com/results?search_query=qml+example

Lien youtube: https://youtu.be/8moq00ofQPY

Supporter le logiciel et la chaîne: https://liberapay.com/Rolisteam/donate
Rolisteam: http://www.rolisteam.org/

Atelier QML à Pas Sage En Seine 2017

Bonjour,

J’ai organisé un atelier à Pas Sage En Seine en juin 2017.
J’ai enfin le temps de m’occuper de mettre en ligne les éléments de formation.
Je mets Ă  disposition les supports de cet atelier.
Il y a une présentation PDF et un projet regroupant les exercices et les solutions.

La présentation est en réalité une application QML. Son code est disponible ici: https://github.com/obiwankennedy/Learn-Qt
Cela constitue en soit un bon exercice que d’arriver à la lancer sur votre ordinateur.

N’hésitez pas à me contacter pour poser des questions.
Je ferais peut-être une vidéo de la formation.

Liens:

L5R présentation

Retours d’expérience d’une présentation QML

Pour préparer ma conférence à Pas Sage En Seine [FR], j’ai décidé de faire une présentation QML.
Cela offre un bien meilleur contrôle, bien plus de possibilité graphique (animations, intégration de code, 3D…) et de même de l’interactivité.
Bien sĂ»r, une prĂ©sentation QML demande plus de temps Ă  faire. Le but de l’article est ici d’expliquer les astuces que j’ai mises en place. EspĂ©rant gagner du temps la prochaine fois.

Le contenu de la présentation QML:

Comme vous pouvez le voir, la prĂ©sentation est une application C++ qui affiche du QML. Cette mĂ©thode permet de faciliter le contrĂ´le de la partie QML. Je m’en sers pour enregistrer des captures d’Ă©cran de la prĂ©sentation afin d’en faire un PDF. C’est le meilleur pour distribuer la prĂ©sentation ou dans le cas ou pour Ă©viter l’effet dĂ©mo.
Tout en haut, il y a les classes C++, les fichiers de management du projet et le fichier main.qml. Dans le rĂ©pertoire «pages», vous y trouverez les diffĂ©rentes slides de la prĂ©sentation. Dans rsrc, il y a l’ensemble des images nĂ©cessaire Ă  la prĂ©sentation.

├── cpphighlighter.cpp
├── cpphighlighter.h 
├── deployment.pri 
├── LICENSE 
├── main.cpp 
├── main.qml 
├── pages 
│ ├── 01_intro.qml 
│ ├── 02_presentation.qml 
│ ├── 03_jdr_et_rolisteam.qml 
│ ├── 043_Exemple_code_1.qml 
│ ├── 04_jdr_avantages_pb.qml 
│ ├── 05_avantage_jdr_virtuel.qml 
│ ├── 06_fonctionnalites_rolisteam.qml 
│ ├── 07_rolisteam_debut.qml 
│ ├── 08_Rolistik_a_Rolisteam.qml 
│ ├── 10_frise_chronologique.qml 
│ ├── 11_son_usage.qml 
│ ├── 12_son_fonctionnement.qml 
│ ├── 13_dice_parser.qml 
│ ├── 14_themes_audio_3_pistes.qml 
│ ├── 15_nouveaute_1_8.qml 
│ ├── 16_projet_avenir.qml 
│ ├── 17_reussites.qml 
│ ├── 18_les_lecons.qml 
│ ├── 19_objectif_rolisteam_libre.qml 
│ ├── 20_FAQ.qml 
├── pasSageEnSeine.pro 
├── pasSageEnSeine.pro.user 
├── qmlcontroler.cpp 
├── qmlcontroler.h 
├── qmlcontroler.ui 
├── qml.qrc 
├── README.md 
├── rsrc 
│ ├── all.png 
│ ├── cc.png 
│ └── chat.png

L’application C++

Il peut ĂŞtre utile de connaĂ®tre l’Ă©tat de la prĂ©sentation QML, et de pouvoir lire des notes sur chaque volet. Pour faire cela, j’ai Ă©cris une petite application C++.

le fichier main.cpp

Le premier objectif de l’application est d’afficher la prĂ©sentation QML. Il faut donc charger le QML et Ă©tablir des moyens de communication entre le monde QML et le C++. Comme vous pouvez le voir, je passe en paramètre la taille de la prĂ©sentation en paramètre du QML. Ce dernier Ă©lĂ©ment n’est pas obligatoire car par dĂ©faut j’utilise la taille de l’Ă©cran comme rĂ©fĂ©rence.

[pastacode lang=”cpp” manual=”%23include%20%3CQApplication%3E%0A%23include%20%3CQQmlApplicationEngine%3E%0A%23include%20%22qmlcontroler.h%22%0A%23include%20%3CQQmlContext%3E%0A%23include%20%3CQQuickTextDocument%3E%0A%0A%23include%20%22cpphighlighter.h%22%0A%0Aint%20main(int%20argc%2C%20char%20*argv%5B%5D)%0A%7B%0A%20%20%20%20QApplication%20app(argc%2C%20argv)%3B%0A%0A%20%20%20%20QQmlApplicationEngine%20engine%3B%0A%0A%20%20%20%20engine.rootContext()-%3EsetContextProperty(%22ScreenW%22%2C1280)%3B%0A%20%20%20%20engine.rootContext()-%3EsetContextProperty(%22ScreenH%22%2C720)%3B%0A%0A%20%20%20%20engine.load(QUrl(QStringLiteral(%22qrc%3A%2Fmain.qml%22)))%3B%0A%0A%20%20%20%20QmlControler%20ctr%3B%0A%20%20%20%20ctr.setEngine(%26engine)%3B%0A%0A%20%20%20%20return%20app.exec()%3B%0A%7D%0A” message=”main.cpp” highlight=”” provider=”manual”/]

Dans ce projet, la classe QmlControler est l’objet (fenĂŞtre) C++ qui affiche l’aperçu de la prĂ©sentation et les commentaires/notes.

Regardons en détails cet élément:

La fenĂŞtre d’aperçu

C’est une simple fenĂŞtre. Elle est dĂ©coupĂ©e en deux parties.  Celle de gauche affiche dans un QLabel l’aperçu de la prĂ©sentation QML. La partie de droite affiche les notes et commentaires sur la page courante dans un QTextArea.

[pastacode lang=”cpp” manual=”void%20QmlControler%3A%3AcurrentPageHasChanged(int%20i)%0A%7B%0A%20%20%20%20m_currentScreen%20%3D%20i%3B%0A%20%20%20%20QImage%20img%20%3D%20m_window-%3EgrabWindow()%3B%0A%0A%20%20%20%20if(img.isNull())%0A%20%20%20%20%20%20%20%20return%3B%0A%0A%20%20%20%20static%20int%20count%20%3D%200%3B%0A%0A%0A%20%20%20%20img.save(tr(%22screens%2F%251_screen.png%22).arg(%2B%2Bcount%2C3%2C10%2CQChar(‘0’))%2C%22png%22)%3B%0A%20%20%20%20qDebug()%20%3C%3C%20%22screen%20shot%20save%22%20%3C%3C%20count%3B%0A%0A%20%20%20%20m_ratioImage%20%3D%20(double)img.size().width()%2Fimg.size().height()%3B%0A%20%20%20%20m_ratioImageBis%20%3D%20(double)img.size().height()%2Fimg.size().width()%3B%0A%0A%20%20%20%20m_label-%3EsetPixmap(QPixmap%3A%3AfromImage(img))%3B%0A%0A%20%20%20%20if((i%2B1%3E%3D0)%26%26(i%2B1%3Cm_commentData.size()))%0A%20%20%20%20%7B%0A%20%20%20%20%20%20%20%20ui-%3EtextEdit-%3EsetHtml(m_commentData.at(i%2B1))%3B%0A%20%20%20%20%7D%0A%20%20%20%20resizeLabel()%3B%0A%7D” message=”Current slide has changed” highlight=”” provider=”manual”/]

Quand la page courante change, la fenĂŞtre C++ est informĂ© par l’appel du slot: currentPageHasChanged alors l’application rĂ©cupère une capture de la vue QML, l’affiche Ă  l’Ă©cran (dans la partie gauche), affiche les notes Ă  propos de la page courante et peut sauvegarder la capture dans un fichier.

Sauvegarder les captures dans des fichiers vous permet de crĂ©er un fichier PDF de votre prĂ©sentation. Il s’agit lĂ  d’une solution de secours en cas de problème avec le matĂ©riel de la prĂ©sentation ou une facilitĂ© pour distribuer votre prĂ©sentation.

La commande qui va bien (sous linux) :

$ convert *.png mypresentation.pdf


L’application QML

Le système de chargement (Loader)

Par souci de clartĂ©, je prĂ©fère avoir un fichier par page. Cela Ă©vite l’Ă©cueil d’un fichier QML long et complexe. L’application charge les pages en accord avec le modele de donnĂ©es principal dans le mĂŞme ordre.  Pour faire cela, j’ai utilisĂ© un ListModel. Une page est dĂ©finie par un titre, un nom de fichier, un temps (non utilisĂ©), et le nom de la page suivante.
Le fichier main.qml  affiche toutes les pages comme un «delegate» d’un pathview.  Toutes les pages sont chargĂ©s depuis le fichier de ressources de Qt (inclue dans le binaire grâce au système de ressources de Qt).

[pastacode lang=”css” manual=”ListModel%20%7B%0A%20%20%20%20%20%20%20%20%20%20%20%20id%3A%20panelModel%0A%20%20%20%20%20%20%20%20%20%20%20%20ListElement%20%7B%0A%20%20%20%20%20%20%20%20%20%20%20%20%20%20%20%20name%3A%20%22Intro%22%0A%20%20%20%20%20%20%20%20%20%20%20%20%20%20%20%20path%3A%20%2201_intro.qml%22%0A%20%20%20%20%20%20%20%20%20%20%20%20%20%20%20%20time%3A%201%0A%20%20%20%20%20%20%20%20%20%20%20%20%20%20%20%20next%3A%20%22Pr%C3%A9sentation%20de%20Rolisteam%22%0A%20%20%20%20%20%20%20%20%20%20%20%20%7D” message=”First item of the model.” highlight=”” provider=”manual”/]

La donnée vraiment utile pour le chargement est bien sûr le nom du fichier.
Les autres sont là pour aider la rédaction ou la présentation.

Le loader fait son travail, voici les lignes importantes:

[pastacode lang=”css” manual=”%20%20%20%20PathView%20%7B%0A%20%20%20%20%20%20%20%20id%3A%20view%0A%20%20%20%20%20%20%20%20anchors.fill%3A%20parent%0A%20%20%20%20%20%20%20%20model%3A%20panelModel%0A%20%20%20%20%20%20%20%20highlightRangeMode%3APathView.StrictlyEnforceRange%0A%20%20%20%20%20%20%20%20snapMode%3A%20PathView.SnapOneItem%0A%20%20%20%20%20%20%20%20delegate%3A%20%20Loader%20%7B%0A%20%20%20%20%20%20%20%20%20%20%20%20%20source%3A%20%22pages%2F%22%2Bpath%0A%20%20%20%20%20%20%20%20%7D” message=”Path View” highlight=”source: “pages/”+path” provider=”manual”/]

Le temps Ă©tait destinĂ© Ă  afficher un compte Ă  rebours pour chaque slide mais je n’ai pas eu le temps de l’implĂ©menter.

Il est important de mettre dans le main.qml tous les Ă©lĂ©ments que vous souhaitez avoir sur toutes les pages: le sommaire, l’indication de la page courante sur le total de pages, etc.

Ajouter un sommaire

Pour rĂ©aliser un sommaire, j’ai ajoutĂ© un ListView avec le modele suivant:

[pastacode lang=”css” manual=”%20%20%20%20ListView%20%7B%0A%20%20%20%20%20%20%20%20id%3A%20listView1%0A%20%20%20%20%20%20%20%20x%3A%20ScreenW*0.02%0A%20%20%20%20%20%20%20%20y%3A%20ScreenH*0.3%0A%20%20%20%20%20%20%20%20width%3A%20ScreenW%2F2%0A%20%20%20%20%20%20%20%20height%3A%20ScreenH*0.2%0A%20%20%20%20%20%20%20%20delegate%3A%20Item%20%7B%0A%20%20%20%20%20%20%20%20%20%20%20%20width%3A%20ScreenW%2F2%0A%20%20%20%20%20%20%20%20%20%20%20%20height%3A%20listView1.height%2FlistView1.count%0A%20%20%20%20%20%20%20%20%20%20%20%20%20%20%20%20Text%20%7B%0A%20%20%20%20%20%20%20%20%20%20%20%20%20%20%20%20%20%20%20%20color%3A%20view.currentIndex%3E%3Dindex%20%3F%20%22black%22%20%3A%20%22gray%22%0A%20%20%20%20%20%20%20%20%20%20%20%20%20%20%20%20%20%20%20%20text%3A%20name%0A%20%20%20%20%20%20%20%20%20%20%20%20%20%20%20%20%20%20%20%20font.pointSize%3A%20ScreenH%2F48%0A%20%20%20%20%20%20%20%20%20%20%20%20%20%20%20%20%20%20%20%20anchors.verticalCenter%3A%20parent.verticalCenter%0A%20%20%20%20%20%20%20%20%20%20%20%20%20%20%20%20%20%20%20%20font.bold%3A%20true%0A%0A%20%20%20%20%20%20%20%20%20%20%20%20%20%20%20%20%7D%0A%20%20%20%20%20%20%20%20%7D%0A%20%20%20%20%20%20%20%20visible%3A%20view.currentIndex%3E0%20%3F%20true%20%3A%20false%0A%0A%20%20%20%20%20%20%20%20model%3A%20ListModel%20%7B%0A%20%20%20%20%20%20%20%20%20%20%20%20ListElement%20%7B%0A%20%20%20%20%20%20%20%20%20%20%20%20%20%20%20%20name%3A%20%22Concepts%22%0A%20%20%20%20%20%20%20%20%20%20%20%20%20%20%20%20index%3A1%0A%20%20%20%20%20%20%20%20%20%20%20%20%7D%0A%20%20%20%20%20%20%20%20%20%20%20%20ListElement%20%7B%0A%20%20%20%20%20%20%20%20%20%20%20%20%20%20%20%20name%3A%20%22Chroniques%22%0A%20%20%20%20%20%20%20%20%20%20%20%20%20%20%20%20index%3A6%0A%20%20%20%20%20%20%20%20%20%20%20%20%7D%0A%20%20%20%20%20%20%20%20%20%20%20%20ListElement%20%7B%0A%20%20%20%20%20%20%20%20%20%20%20%20%20%20%20%20name%3A%20%22Logiciel%22%2F%2Fsyst%C3%A8me%20de%20build%2C%20code%20sp%C3%A9cifique%20par%20OS.%0A%20%20%20%20%20%20%20%20%20%20%20%20%20%20%20%20index%3A9%0A%20%20%20%20%20%20%20%20%20%20%20%20%7D%0A%20%20%20%20%20%20%20%20%20%20%20%20ListElement%20%7B%0A%20%20%20%20%20%20%20%20%20%20%20%20%20%20%20%20name%3A%20%22Bilan%22%0A%20%20%20%20%20%20%20%20%20%20%20%20%20%20%20%20index%3A15%0A%20%20%20%20%20%20%20%20%20%20%20%20%7D%0A%20%20%20%20%20%20%20%20%7D%0A%20%20%20%20%7D” message=”Table of contents in QML ” highlight=”” provider=”manual”/]

Le champs index du modèle permet de connaître la page qui démarre cette section du sommaire.

Page suivante

Quand il y a beaucoup de pages il peut ĂŞtre intĂ©ressant de connaĂ®tre la prochaine page afin de faire une petite transition vers elle. Dans mon cas, j’affiche dans le coin haut-droit le titre de la prochaine page. Ce fut assez utile pour les rĂ©pĂ©titions, je n’en ai presque pas eu besoin pendant la confĂ©rence.

[pastacode lang=”css” manual=”%20%20%20%20Text%20%7B%0A%20%20%20%20%20%20%20%20anchors.top%3A%20parent.top%0A%20%20%20%20%20%20%20%20anchors.right%3A%20parent.right%0A%20%20%20%20%20%20%20%20text%3A%20panelModel.get(view.currentIndex).next%2B%22%3E%22%0A%20%20%20%20%7D” message=”Next slide” highlight=”” provider=”manual”/]

L’autre possibilitĂ© est d’utiliser les notes dans la fenĂŞtre C++.

Créer une Page de présentation QML

Chaque page est indĂ©pendante, elles peuvent ĂŞtre totalement diffĂ©rentes cependant pour des raisons de simplicitĂ©, elle utilise une conception identique. Dans mon cas, elles sont constituĂ©es d’une ListView avec un modèle. Chaque Ă©lĂ©ment du modèle est un titre de section Ă  Ă©voquer pendant la prĂ©sentation.

Les Ă©lĂ©ments ont un index. Cet index est contrĂ´lĂ© par le clavier (flèche bas pour augmenter l’index, haut pour rĂ©duire l’index).  Grâce Ă  cet index, il est possible de cacher la liste et d’afficher une image, un schĂ©ma ou une vidĂ©o.

Par exemple, dans ma prĂ©sentation la fonctionnalitĂ© «Alias de dĂ©s» a pour index 10. Quand la index de la page devient 10, l’Ă©lĂ©ment «Alias de dĂ©s» apparaĂ®t avec une petite animation. Puis l’index passe Ă  11, j’affiche une image illustrant la fonctionnalitĂ© des alias de dĂ©s. A 12, l’image disparaĂ®t et le texte revient.

Position et taille

Pour s’assurer de la lisibilitĂ© des Ă©lĂ©ments, je rĂ©alise l’ensemble des calculs en rapport Ă  la taille de l’Ă©cran. Le positionnement est assurĂ© par des ancres (anchors en qml).

[pastacode lang=”css” manual=”%20%20%20%20Image%20%7B%0A%20%20%20%20%20%20%20%20id%3A%20image1%0A%20%20%20%20%20%20%20%20anchors.left%3A%20parent.left%0A%20%20%20%20%20%20%20%20anchors.top%3A%20parent.top%0A%20%20%20%20%20%20%20%20anchors.leftMargin%3A%20ScreenW*0.04%0A%20%20%20%20%20%20%20%20fillMode%3A%20Image.PreserveAspectFit%0A%20%20%20%20%20%20%20%20source%3A%20%22qrc%3A%2Frsrc%2FRolisteam.svg%22%0A%20%20%20%20%20%20%20%20width%3A%20ScreenW*0.2%0A%20%20%20%20%7D” message=”Display the logo at the right position and size.” highlight=”” provider=”manual”/]

Autre piste

Il existe un module qui fournit des Ă©lĂ©ments QML pour faciliter la rĂ©alisation d’une prĂ©sentation. Je ne l’ai pas utilisĂ© mais il y a des choses intĂ©ressantes.

Module QML

Obtenir le code de mes présentations

Je vous invite Ă  cloner ce code : https://github.com/obiwankennedy/pses

Autre exemple avec une image: https://github.com/obiwankennedy/l5rSummary

L5R présentation QML

Exemple de présentation QML


Make your own slide show presentation in QML

To prepare my conference at Pas Sage En Seine [FR], a French hacking festival, I chose to write my slide presentation in QML.
It allows me to have better control and be free to do whatever I want (such as a timeline or any kind of animation).
Of course, That comes with a price. It is longer to do it that way but now I find some solutions. So, next time will be faster.

File hierarchy:

I preferred use QML through C++ Application. It provides more helpful feature, such as: the ability to make screenshots of your presentation at any time (useful as backup plan).
At the top level, you will found all C++ classes, project files and the main qml. Then, you will have a directory with all your pages and if it is required a directory with all your images.

├── cpphighlighter.cpp
├── cpphighlighter.h
├── deployment.pri
├── LICENSE
├── main.cpp
├── main.qml
├── pages
│   ├── 01_intro.qml
│   ├── 02_presentation.qml
│   ├── 03_jdr_et_rolisteam.qml
│   ├── 043_Exemple_code_1.qml
│   ├── 04_jdr_avantages_pb.qml
│   ├── 05_avantage_jdr_virtuel.qml
│   ├── 06_fonctionnalites_rolisteam.qml
│   ├── 07_rolisteam_debut.qml
│   ├── 08_Rolistik_a_Rolisteam.qml
│   ├── 10_frise_chronologique.qml
│   ├── 11_son_usage.qml
│   ├── 12_son_fonctionnement.qml
│   ├── 13_dice_parser.qml
│   ├── 14_themes_audio_3_pistes.qml
│   ├── 15_nouveaute_1_8.qml
│   ├── 16_projet_avenir.qml
│   ├── 17_reussites.qml
│   ├── 18_les_lecons.qml
│   ├── 19_objectif_rolisteam_libre.qml
│   ├── 20_FAQ.qml
├── pasSageEnSeine.pro
├── pasSageEnSeine.pro.user
├── qmlcontroler.cpp
├── qmlcontroler.h
├── qmlcontroler.ui
├── qml.qrc
├── README.md
├── rsrc
│   ├── all.png
│   ├── cc.png
│   └── chat.png

The C++ application

The main

It can be useful to see the state of the presentation and to read some extra notes about the current slide. To manage that, I wrote a small C++ application.
The first goal is to show the QML view, then add some features and communication between the QML view and the C++ window.

[pastacode lang=”cpp” manual=”%23include%20%3CQApplication%3E%0A%23include%20%3CQQmlApplicationEngine%3E%0A%23include%20%22qmlcontroler.h%22%0A%23include%20%3CQQmlContext%3E%0A%23include%20%3CQQuickTextDocument%3E%0A%0A%23include%20%22cpphighlighter.h%22%0A%0Aint%20main(int%20argc%2C%20char%20*argv%5B%5D)%0A%7B%0A%20%20%20%20QApplication%20app(argc%2C%20argv)%3B%0A%0A%20%20%20%20QQmlApplicationEngine%20engine%3B%0A%0A%20%20%20%20engine.rootContext()-%3EsetContextProperty(%22ScreenW%22%2C1280)%3B%0A%20%20%20%20engine.rootContext()-%3EsetContextProperty(%22ScreenH%22%2C720)%3B%0A%0A%20%20%20%20engine.load(QUrl(QStringLiteral(%22qrc%3A%2Fmain.qml%22)))%3B%0A%0A%20%20%20%20QmlControler%20ctr%3B%0A%20%20%20%20ctr.setEngine(%26engine)%3B%0A%0A%20%20%20%20return%20app.exec()%3B%0A%7D%0A” message=”main.cpp” highlight=”” provider=”manual”/]

Really easy, it loads the main.qml from the resources management system provided by Qt. It defines the targeted resolution by setting two constant into QML word: ScreenW and ScreenH.

In this project, the QmlControler class is the C++ window which provides slide feedback and additional information.

Let’s take a look to it:

Feedback window

This window is really simple. It has two parts: On the left, there is a label which displays screenshot of the qml view, and the right part is a QTextArea which display any additional note about the current slide.

[pastacode lang=”cpp” manual=”void%20QmlControler%3A%3AcurrentPageHasChanged(int%20i)%0A%7B%0A%20%20%20%20m_currentScreen%20%3D%20i%3B%0A%20%20%20%20QImage%20img%20%3D%20m_window-%3EgrabWindow()%3B%0A%0A%20%20%20%20if(img.isNull())%0A%20%20%20%20%20%20%20%20return%3B%0A%0A%20%20%20%20static%20int%20count%20%3D%200%3B%0A%0A%0A%20%20%20%20img.save(tr(%22screens%2F%251_screen.png%22).arg(%2B%2Bcount%2C3%2C10%2CQChar(‘0’))%2C%22png%22)%3B%0A%20%20%20%20qDebug()%20%3C%3C%20%22screen%20shot%20save%22%20%3C%3C%20count%3B%0A%0A%20%20%20%20m_ratioImage%20%3D%20(double)img.size().width()%2Fimg.size().height()%3B%0A%20%20%20%20m_ratioImageBis%20%3D%20(double)img.size().height()%2Fimg.size().width()%3B%0A%0A%20%20%20%20m_label-%3EsetPixmap(QPixmap%3A%3AfromImage(img))%3B%0A%0A%20%20%20%20if((i%2B1%3E%3D0)%26%26(i%2B1%3Cm_commentData.size()))%0A%20%20%20%20%7B%0A%20%20%20%20%20%20%20%20ui-%3EtextEdit-%3EsetHtml(m_commentData.at(i%2B1))%3B%0A%20%20%20%20%7D%0A%20%20%20%20resizeLabel()%3B%0A%7D” message=”Current slide has changed” highlight=”” provider=”manual”/]

When the current slide has changed, the c++ window is notified thought the slot currentPageHasChanged, The application gets screenshot of the qml view, save it as a file, display it thought the label, then it looks for data about the current slide into the model. If any, there are displayed in the textedit.

Saving screenshots into file allows you to create a pdf file as backup plan for your presentation.

$ convert *.png mypresentation.pdf


QML Application

Loader system.

For readability reason, it is easier to have each page into one qml file. The application has to load those pages in the right order. To reach this goal, we have to define the order. I did it thank to a data model inside the main.qml file.
The main.qml displays all pages as item of a pathview. All items are loaded from the qt resource management system.

[pastacode lang=”css” manual=”ListModel%20%7B%0A%20%20%20%20%20%20%20%20%20%20%20%20id%3A%20panelModel%0A%20%20%20%20%20%20%20%20%20%20%20%20ListElement%20%7B%0A%20%20%20%20%20%20%20%20%20%20%20%20%20%20%20%20name%3A%20%22Intro%22%0A%20%20%20%20%20%20%20%20%20%20%20%20%20%20%20%20path%3A%20%2201_intro.qml%22%0A%20%20%20%20%20%20%20%20%20%20%20%20%20%20%20%20time%3A%201%0A%20%20%20%20%20%20%20%20%20%20%20%20%20%20%20%20next%3A%20%22Pr%C3%A9sentation%20de%20Rolisteam%22%0A%20%20%20%20%20%20%20%20%20%20%20%20%7D” message=”First item of the model.” highlight=”” provider=”manual”/]

A page is mainly defined by two data: name and path. The path is the name of the qml file.
All other data are here as help, the time has not been used.

Then, the loader does its job, the key lines are the following:

[pastacode lang=”css” manual=”%20%20%20%20PathView%20%7B%0A%20%20%20%20%20%20%20%20id%3A%20view%0A%20%20%20%20%20%20%20%20anchors.fill%3A%20parent%0A%20%20%20%20%20%20%20%20model%3A%20panelModel%0A%20%20%20%20%20%20%20%20highlightRangeMode%3APathView.StrictlyEnforceRange%0A%20%20%20%20%20%20%20%20snapMode%3A%20PathView.SnapOneItem%0A%20%20%20%20%20%20%20%20delegate%3A%20%20Loader%20%7B%0A%20%20%20%20%20%20%20%20%20%20%20%20%20source%3A%20%22pages%2F%22%2Bpath%0A%20%20%20%20%20%20%20%20%7D” message=”Path View” highlight=”source: “pages/”+path” provider=”manual”/]


Table of Contents

To manage the table of contents, I added a listview with a model:

[pastacode lang=”css” manual=”%20%20%20%20ListView%20%7B%0A%20%20%20%20%20%20%20%20id%3A%20listView1%0A%20%20%20%20%20%20%20%20x%3A%20ScreenW*0.02%0A%20%20%20%20%20%20%20%20y%3A%20ScreenH*0.3%0A%20%20%20%20%20%20%20%20width%3A%20ScreenW%2F2%0A%20%20%20%20%20%20%20%20height%3A%20ScreenH*0.2%0A%20%20%20%20%20%20%20%20delegate%3A%20Item%20%7B%0A%20%20%20%20%20%20%20%20%20%20%20%20width%3A%20ScreenW%2F2%0A%20%20%20%20%20%20%20%20%20%20%20%20height%3A%20listView1.height%2FlistView1.count%0A%20%20%20%20%20%20%20%20%20%20%20%20%20%20%20%20Text%20%7B%0A%20%20%20%20%20%20%20%20%20%20%20%20%20%20%20%20%20%20%20%20color%3A%20view.currentIndex%3E%3Dindex%20%3F%20%22black%22%20%3A%20%22gray%22%0A%20%20%20%20%20%20%20%20%20%20%20%20%20%20%20%20%20%20%20%20text%3A%20name%0A%20%20%20%20%20%20%20%20%20%20%20%20%20%20%20%20%20%20%20%20font.pointSize%3A%20ScreenH%2F48%0A%20%20%20%20%20%20%20%20%20%20%20%20%20%20%20%20%20%20%20%20anchors.verticalCenter%3A%20parent.verticalCenter%0A%20%20%20%20%20%20%20%20%20%20%20%20%20%20%20%20%20%20%20%20font.bold%3A%20true%0A%0A%20%20%20%20%20%20%20%20%20%20%20%20%20%20%20%20%7D%0A%20%20%20%20%20%20%20%20%7D%0A%20%20%20%20%20%20%20%20visible%3A%20view.currentIndex%3E0%20%3F%20true%20%3A%20false%0A%0A%20%20%20%20%20%20%20%20model%3A%20ListModel%20%7B%0A%20%20%20%20%20%20%20%20%20%20%20%20ListElement%20%7B%0A%20%20%20%20%20%20%20%20%20%20%20%20%20%20%20%20name%3A%20%22Concepts%22%0A%20%20%20%20%20%20%20%20%20%20%20%20%20%20%20%20index%3A1%0A%20%20%20%20%20%20%20%20%20%20%20%20%7D%0A%20%20%20%20%20%20%20%20%20%20%20%20ListElement%20%7B%0A%20%20%20%20%20%20%20%20%20%20%20%20%20%20%20%20name%3A%20%22Chroniques%22%0A%20%20%20%20%20%20%20%20%20%20%20%20%20%20%20%20index%3A6%0A%20%20%20%20%20%20%20%20%20%20%20%20%7D%0A%20%20%20%20%20%20%20%20%20%20%20%20ListElement%20%7B%0A%20%20%20%20%20%20%20%20%20%20%20%20%20%20%20%20name%3A%20%22Logiciel%22%2F%2Fsyst%C3%A8me%20de%20build%2C%20code%20sp%C3%A9cifique%20par%20OS.%0A%20%20%20%20%20%20%20%20%20%20%20%20%20%20%20%20index%3A9%0A%20%20%20%20%20%20%20%20%20%20%20%20%7D%0A%20%20%20%20%20%20%20%20%20%20%20%20ListElement%20%7B%0A%20%20%20%20%20%20%20%20%20%20%20%20%20%20%20%20name%3A%20%22Bilan%22%0A%20%20%20%20%20%20%20%20%20%20%20%20%20%20%20%20index%3A15%0A%20%20%20%20%20%20%20%20%20%20%20%20%7D%0A%20%20%20%20%20%20%20%20%7D%0A%20%20%20%20%7D” message=”Table of contents in QML ” highlight=”” provider=”manual”/]

Next slide

When you have many slides it can be helpful to have indication about the next one. I chose to display the title in the top-right corner. It was the easier way.

[pastacode lang=”css” manual=”%20%20%20%20Text%20%7B%0A%20%20%20%20%20%20%20%20anchors.top%3A%20parent.top%0A%20%20%20%20%20%20%20%20anchors.right%3A%20parent.right%0A%20%20%20%20%20%20%20%20text%3A%20panelModel.get(view.currentIndex).next%2B%22%3E%22%0A%20%20%20%20%7D” message=”Next slide” highlight=”” provider=”manual”/]


Design a page

Each page are independent but they are all based on the same pattern. In my case, they have a listview with model. Each item of the model is an point I should talk about it.

Each item has a index. The index is controlled with keyboard (down to increase, up to decrease). The page manages what is shown or hidden given the value of the index.

For example, the feature of dice alias has 10 as index. When the index page value becomes 10, the «Dice Alias»  item is displayed with an animation. Then, at 11, I can show a screen shot about the dice alias. At 12, the screenshot disappears and another text is displayed.

Position and Size

To ensure that all items will be display at the proper position and size.  I have based all computation on anchor or the screen size.

[pastacode lang=”css” manual=”%20%20%20%20Image%20%7B%0A%20%20%20%20%20%20%20%20id%3A%20image1%0A%20%20%20%20%20%20%20%20anchors.left%3A%20parent.left%0A%20%20%20%20%20%20%20%20anchors.top%3A%20parent.top%0A%20%20%20%20%20%20%20%20anchors.leftMargin%3A%20ScreenW*0.04%0A%20%20%20%20%20%20%20%20fillMode%3A%20Image.PreserveAspectFit%0A%20%20%20%20%20%20%20%20source%3A%20%22qrc%3A%2Frsrc%2FRolisteam.svg%22%0A%20%20%20%20%20%20%20%20width%3A%20ScreenW*0.2%0A%20%20%20%20%7D” message=”Display the logo at the right position and size.” highlight=”” provider=”manual”/]

Other way

There is a module that provides Items to create QML presentation. I don’t use it for this one but it may provide interesting things.

https://github.com/qt-labs/qml-presentation-system

Get the code

You are invited to clone the code at : https://github.com/obiwankennedy/pses